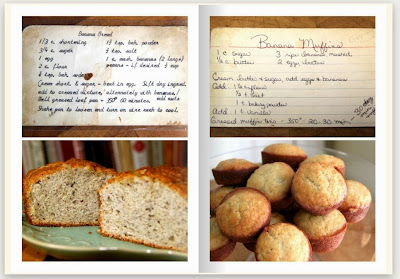
Good news! I can share my book with you by providing a simple link. If you would like a PDF let me know and I can send it your way for use on an iPad etc. Here are some picture sneak peaks...
Friday, December 13, 2013
Scarbrough Family Cookbook - Link Available
It's no secret. I'm behind on posting. The cookbooks are finished and gifted to mom and sisters. Milkbooks was a bit of a disaster and I will not be using them again...EVER. But the books are completed (started in August and shipping each time took a month). Just recently I noticed I left off the Mother/Daughter Tea Punch and my cheese straws take 15 minutes and NOT 30 minutes to bake (incorrect on my recipe card). Sooooo please keep that in mind. Also, much to Jill's dismay, only one picture of her made it into the cookbook. How did that happen?!
Good news! I can share my book with you by providing a simple link. If you would like a PDF let me know and I can send it your way for use on an iPad etc. Here are some picture sneak peaks...
Good news! I can share my book with you by providing a simple link. If you would like a PDF let me know and I can send it your way for use on an iPad etc. Here are some picture sneak peaks...
Monday, December 9, 2013
Engagement (woohoo) Update
For the few people who follow my blog, there is a reason I have been absent. The family cookbooks are complete (post regarding that at a later date). But most importantly, I am engaged!
With that comes not only a wedding to plan but a cross-country move to Idaho. Perhaps you will see more potato recipes on here in the future. One thing is for sure. I must get my fill of southern food...pronto. My mission is to learn how to recreate the Palmetto pimento cheese. I live on it. (Ok, maybe moving away from that is not a bad thing.)
Since this website started as a way for me to keep track of recipes and I cannot seem to find anything I store in email, I thought I might make a list for myself. This list will be "go-tos" of what I can cook when Hunter and I are hungry and planning meals. So forgive me. This part is more for my own personal use!
Beef Patties and Mushrooms
Chili
Shrimp Chowder
Chinese Stir Fry (Aprons recipe)
French Toast (breakfast)
Hamburgers
Pizza
Pork Tenderloin and veggies
Shrimp and Grits
Spaghetti and Meatballs (if in freezer or ground beef)
Spinach Pasta Bake
Taco Soup
Tomato Rigatoni
Pot Roast
Chicken and Rice
Beef Broccoli Stir Fry
I am sure I will look back on this one day and laugh.
Sunday, July 14, 2013
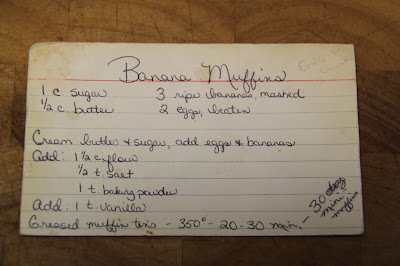
Banana Muffins
Let me explain the difference between banana bread and banana muffins. There is a difference. First off, this recipe is best in muffin form while the bread recipe is better as a loaf. Banana muffins are sticky sweet. They have more banana flavor (because of more actual banana and less flour). This recipe was SO very popular with my childhood friends. In fact, one friend would request them every time she came over.
I didn't freeze bananas until this year and now I wonder how I went without. It's so much more convenient. They don't look beautiful when they thaw (they turn black on the outside and become all juicy on the inside). I may even say it makes the baked goods more moist.
Maw's Refrigerator Cookies (Shortbread Cookies)
The family recipe book assembly is still underway! It's reminding me of some of my FAVORITE recipes from childhood. These shortbread cookies Maw (Mom's mother) made for us. She would sprinkle them with colored crystal sugars. The bonus about this recipe....you can keep them in log form (see below) in the refrigerator for a week! And for a girl who absolutely loves chocolate - I can tell you these rank up there!
Mine were a little brown. Keep your eyes on them! I am not going to write out the steps because I did what was written on the recipe card. This is one of Maw's recipe cards. You can tell because she always used her cursive typewriter. I love it!
 |
Note: It is easier to make the logs actually square. I wrapped mine in parchment paper!
Monday, May 20, 2013
Maw's Banana Bread
Maw's Banana Bread
I had to triple check to be sure I had not posted this recipe before. This was THE first recipe I knew by heart and I remember making it long before college. I still have not found a better banana bread. According to the rate it disappeared this morning at work, I am not the only fan!
I've decided for many of these recipes I am going to skip boring pictures. I can only take shots of the mixer and batter so many times before they all start looking the same, even for me!
I love this recipe card. Mom must have covered it in contact paper to preserve it. It's had a lot of use!
This is my secret. I now only use frozen bananas. The thought used to give me the heebie jeebies. But after I tried it a couple years ago, it works out well. They mash so much easier, provide more liquid, and are so very convenient! (On a side note, I freeze the bread often once its baked and it is also wonderful. I have 3 small baking pans that I used last time to try to limit myself!)
It took me 2 years to go through the huge tub of crisco you see in this picture. It was embarrassingly large. I ran into this the other day and figured it is worth a try. So far, it is a wonderful substitute. If anything, it makes me feel better!
The batter still ranks in my top 5 batters of all-time. Nuts are optional but with Hunter gone, they are a necessity in my book. I love them.
I used bread flour this time and it never seems to rise enough but I wanted to finish the bag. Basic all-purpose is my first choice!
And here we have a photo of my favorite way to enjoy the bread. Ok, second favorite way. My favorite is the toaster!
Wednesday, May 15, 2013
Maw's Ham-Cheese Quiche
Maw's Ham-Cheese Quiche
Last night I returned to cooking for my family recipe book. Hunter was in town for the weekend and I gained a few pounds (at least) from all we ate. Friday night we even had dinner at Hot and Hot Fish Club. We've now been to Highlands and Hot and Hot...two on my list thanks to White Plume (who has given me the thank-you dinners). It is now official. After 8.5 years I will be leaving my work family to start a new adventure. It is a wonderful opportunity to put my MBA to use. I hope my new office likes to eat. Or I will still be delivering goodies to White Plume on a regular basis!
Back to the quiche. I had some for lunch today and took pictures. I will certainly be making this again!
Maw's Ham and Cheese Quiche
Serves 6
Serves 6
Ingredients:
9" pie crust (I cheated and used the frozen ones...thawed it before using.)
1 1/2 c. grated Swiss Cheese
4 tsp flour
1/2 c. diced ham
3 eggs
1 c. milk
1/4 tsp dry mustard
1/4 tsp salt
I love Maw's recipe cards. What she lacked in handwriting she made up with her script typewriter.
I cheated and used a pie crust. Next time I will use Maw's pie crust recipe!
I was walking the dog when I should have kept it from browning. Again, I won't put it on the top burner next time. It still tastes delicious. You can certainly add more ham than 1/2 cup if you choose!
I felt like it was time to sneak in a Brody picture. We ate on the patio. Here he is doing his version of downward dog...he sticks out his tongue. It is my favorite!
Sunday, May 5, 2013
Scarbrough Strawberry Trifle
I am working on a family cookbook, filled with recipes from my aunt, mom, grandmother, relatives, and church friends....
For most recipes, I will take photos to place alongside the text in the cookbook. I've already posted some of the recipes along the way like the cheese straws and oatmeal crispies. This week I made the classic trifle (see spin off I created here).
When I was a child I requested this trifle in place of a birthday cake one year. If you know me, you know I am a chocolate fanatic so this is hard to believe. The trifle is worth it. You can make your angel food cake and pudding from scratch but why do so when this recipe works SO well! Let me know what you think. The presentation is phenomenal without much effort. Add blueberries and it is perfect for July 4th!
STRAWBERRY TRIFLE
1 large angel food cake
1 large instant vanilla pudding
1 8 oz sour cream
1 large 12 oz cool whip (you will see I used 2 6 oz)
Strawberry syrup
2 pints fresh strawberries
Prep:
Mix pudding and 1/2 cup milk with mixer until pudding forms. Stir in sour cream.
Slice strawberries and let sit in syrup.
Layer:
How you layer is key.
 |
| cake should always go on bottom topped with pudding (not pictured) |
 |
| i try to be "healthy" and use fat free mixed with low fat (i cannot tell the difference) |
 |
| top with strawberries and repeat |
 |
| have fun with the design. warning. my strawberry syrup is everywhere...you may want to go easy on the topping |
Saturday, March 2, 2013
Apple Brie Wraps
It's snowing outside and I could argue it's colder than Idaho. Honestly. So today I stayed inside (even though I have a case of spring fever).
I will keep this recipe and use it often. (Thank you, Pinterest.) Everyone agreed it was a great find. It will take you no time. Plus, it is only 5 ingredients!
Honey
Brie
Crescent Rolls
Apple
Pecans
I don't have exact measurements but you can take liberty as you see fit. I also saw mentions of cheese substitutions and one person used pears in the place of apples. The original recipe called for tart apples. I am not a fan of tart apples so I found Jazz apples. I thought the red would be pretty but this time, I couldn't even see them. I would purchase 2 packages of crescent rolls for sure.
This is how I sliced the cheese. I've heard of brie logs but this worked just fine. I sliced the block lengthwise and the slices into 3 pieces.
And now we have a picture of the assembly. When I made the appetizers earlier this week, I laid everything out on a cookie sheet but the apples and put it in the frig. The crescent rolls dried out a bit but, after baking, there was no difference. When it was time to bake, I cut the apples. This time I tried slicing the apple lengthwise so the pieces were flat for stacking. Last time I did make slices and evened the top so the toppings laid flat.
Place the ingredients in the middle of the dough. I first folded over the big flap and then secured it with the pointed part of the crescent roll.
Bake @ 375 degrees for approximately 12 minutes.
The house will smell FABULOUS.
I couldn't resist. I sampled. To show you, of course.
Sunday, February 10, 2013
Mom's Cheese Straws
Mom has been making cheese straws frequently (that is an understatement) for the past few years. Last year she got all 3 daughters our own cookie press. She searched high and low for the best one and landed on Mercato press below. I am embarrassed to say I have only used mine twice (on my own). People are fascinated with cheese straws. The ingredients are simple but parts are labor intensive. The best part...they are WONDERFUL to freeze and frozen. In fact, I love them right out of the freezer. That is not necessarily a good thing and is why I had to make another batch for a party in a few weeks.
RECIPE:
*Mom said she bakes hers for 15 minutes. No wonder mine were burned!*
INGREDIENTS:
This is the first labor intensive part. You do NOT want to purchase pre-shredded cheese. It is too dry and will not hold the ingredients together. In fact, I had a block of both Publix and Kraft sharp cheddar. The Publix brand worked much better. The Kraft would fall apart in chunks while grating. I look for the cheese when it is on special. You can see the recipe card reads you can substitute other cheese for cheddar. I haven't tried it but if I do, I will let you know.
Note: Often extra sharp cheddar is drier than what is needed. I always use sharp cheddar. (Since this original post I got married and was gifted the most amazing food processor that does this grating for me in a matter of seconds...not as much of an arm workout!)
Measure the dry ingredients and place it in a gallon zip-lock bag below (flour, salt, baking powder, pepper). Give it a good shake. Add the shredded cheese and shake again.
Melt your 2 sticks of unsalted butter in a large mixing bowl that will hold all ingredients.
Now comes labor intensive part #2. Wash your hands well (please), pour dry ingredients into bowl with butter and mix with your hands. You will want to knead until it becomes play-dough. You want to get rid of all crumbles. It takes awhile but be patient. It will eventually look like my picture below.
Now time for the cookie press. This is the kind we use.
This cookie tip is what creates the "straws."
Roll the dough in logs for the cookie press.
I will admit this part KILLS my hands. Cue labor intensive part #3. The dough is hard to push through the press. Today I learned my oven mitt provides some protection!
I have two large INSULATED cookie sheets I use for my oven that are perfect for the top and bottom shelves. Don't worry if they break and are not perfectly straight. The below cookie sheet is a fluke and the best I've ever done. You will cut them after they cook anyway!
Cook at 325 for about 15 minutes. Your oven can vary so keep an eye on them. They are not tasty brown so do not overcook. Once they come out of the oven, split the straws in desired lengths with a plastic spatula (don't want to scratch your cookie sheet).
The recipe is easily doubled if you would like (and have the self control) to keep some in the freezer. To give you an idea, the recipe above made enough to fill these three containers. Mom found these containers at WalMart and are the perfect size once sliced.
Now, I will have to send this link to my coworkers. There were many conversations around the baby shower table on how you make cheese straws!
Subscribe to:
Posts (Atom)


